We provide two options to help you determine where to sample: a conditioned Latin Hypercube Sampling (cLHS) or Random Sampling.
Using cLHS
This can help you accurately identify where you need to sample over a given area by looking at the variation across the zone, and ensuring you sample at variance points across the variation. For example, if you wish to sample for clay content over an area, and the soil management zones created reflect clay, cLHS will help guide you to sample the low, middle and high parts of that variation.
cLHS can also be used to determine sample points across each zone in the case you wants to bulk those sample points as ‘sub samples’, into a single sample. That single sample will combine the full variation of soil taken across that zone, and allow you to cost effectively manage a paddock using the result (which will be the mean of the zone sampled).
The cLHS algorithm was designed to support the calibration of digital soil maps. It provides optimal sample locations over an area given various inputs, and in the case of soil sampling can be used to calibrate soil management zones. It’s important to emphasise that you should use datasets that reflect the soil properties or nutrients being investigated for cLHS to be effective, which is why it is run in conjunction with the soil management zones.
Using Random Sampling
Random sampling is another technique that can help you identify sample points within a zone. Unlike cLHS it doesn’t reference the variables used in the creation of the zones to provide sample points, instead this is done randomly within each zone. This has been included because it is a mandated method within the ERF carbon baselining guidelines, and allows users to use FarmLab to measure soil carbon for baseline measurements.
Excluding Samples Near Boundaries
To avoid sampling near a fence line or paddock boundary that may not render an accurate result, we’ve included a boundary limiter to allow you to specify a range to which to avoid a paddock or zone boundary by. By default this is set to 30m, and means any sample points generated must be at least 30m from any paddock or zone boundaries.
It’s important to note that if this is used, soil management zones that are less than 30m wide or tall will be excluded from sampling. If you find this is the case, simply re run the zones and reduce the boundary limiter setting.
Number of Samples
We recommend that a minimum of 4 samples need to be taken per zone (either sub samples or individual samples) for an accurate reading to be provided. More samples will render a more accurate calibration of that zone, with Figure 2 below showing the relationship between the number of samples required and the coefficient of variation.
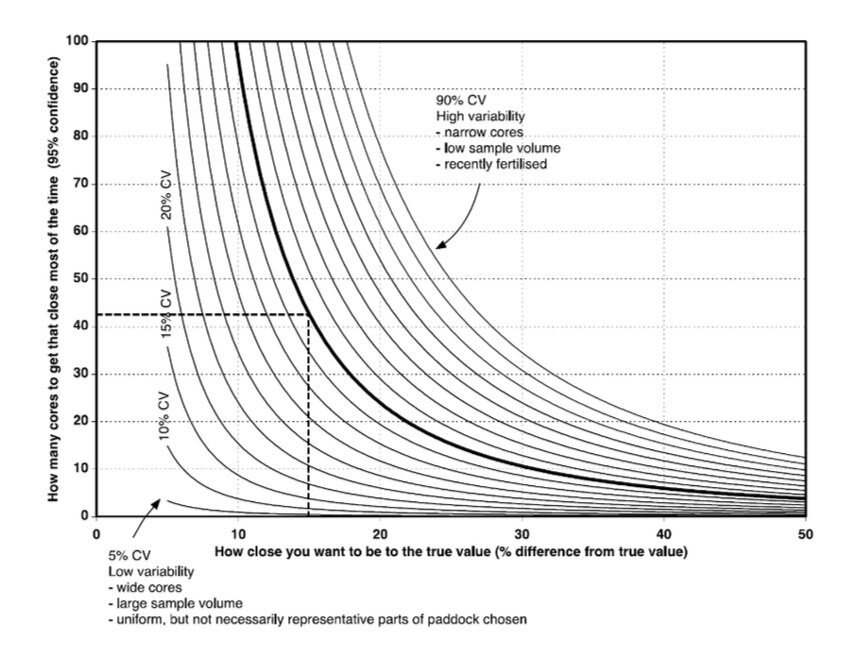
Source: Gilbert 1987 from Fertcare Sampling Guide 2019
Figure 2. The number of cores (samples) required relative to the level of accuracy (CV = coefficient of variation). Source: Gilbert 1987 from Fertcare Sampling Guide 2019